
eLabFTW, The Best Free Electronic Lab Notebook Setup - Network Configuration
This post is translated by Gemini 2.5 Pro based on THIS post.

In this installment, we’re going to cover how to successfully expose our hard-won eLabFTW installation to the outside world. To do this, a basic understanding of networking is necessary. Through this post, we will come to understand the basic concepts of networking, including IP, ports, Docker, and DDNS.
In the last post, we successfully installed and ran elabftw with WSL2 and Docker on a Windows operating system. Now, the real installation is complete only when we can access it from the outside (the internet or an internal network) using my PC’s (Windows) IP.
1️⃣ Understanding and Fixing the WSL2 IP
As mentioned last time, WSL2 is a feature that creates a virtual environment. It’s connected to a virtual NAT network, which means it gets assigned its own unique IP address. An IP is a unique number a computer has when it connects to the internet. When you connect to an internet line, you usually get one such IP.
Wait, but how do multiple devices in each household connect to the internet?
That’s thanks to the router’s internal IP allocation function. This router, commonly known as a Wi-Fi router, creates an internal network IP from its single external IP (e.g., 172.19.113.217). These virtual IPs usually have a designated range; if you’re using an iptime router, you’re probably using numbers in the 192.168.0.1~255 range.
Just like this router function, the WSL2’s virtual NAT network also uses virtual numbers. eLabFTW was installed through a virtual environment called Docker, but outside that virtual environment is another virtual environment called WSL2. Therefore, the elabftw container is bound to the WSL2 internal IP (e.g., 172.19.113.217), so if this address changes, the netsh portproxy on Windows also needs to be reconfigured. For example, if someone from the outside tries to connect to the 172.19.113.217 IP, my computer must recognize this and forward the information to the internal IP.
Here’s a diagram of what that looks like:
┌─────────────────┐
│ External User (Internet)         │
│ Request: https://mylab.ddns.org  │
└─────────────────┘
              │
              ▼
      [DNS Lookup (DDNS)]
       mylab.ddns.org
              │
              │ (Returns the public IP associated with the domain)
              ▼
      Public IP (e.g., 203.0.113.45)
              │
              ▼
┌─────────────────────────────────┐
│ Router (Public IP holder - this is the IP from your ISP)         │
│ Port Forwarding Rule:                                            │
│   External Port 443 → Internal IP e.g., 192.168.0.2, Port 443   │
└─────────────────────────────────┘
              │ (Forwards traffic to the Windows PC)
              ▼
┌───────────────────────────────┐
│ Windows PC (Internal IP: 192.168.0.2)                        │
│ netsh portproxy setting:                                     │
│   Listen on port 443 → Forward to WSL2's 172.19.113.217:443 │
│ May need to allow port 443 in firewall settings.             │
└───────────────────────────────┘
              │ (Forwards to WSL2 virtual network)
              ▼
┌───────────────────────────────┐
│ WSL2 (Virtual Env IP: 172.19.113.217)                        │
│ Docker Engine is running                                     │
│ Docker forwards requests on port 443 of 172.19.113.217       │
│  to the internal container.                                  │
│ Maps 0.0.0.0:443 → Docker container:443                     │
└───────────────────────────────┘
              │ (Docker network bridge)
              ▼
┌────────────────┐
│ eLabFTW Container (Port 443)   │
│ Response complete!             │
└────────────────┘
Now that we’ve reviewed the overall picture, all you need to do is follow the guide below.
1-1. Check the Current Internal IP of WSL2
First, we need to know the virtual IP address that the WSL2 environment is using. Enter the command below into the WSL2 console window. If you’ve already forgotten, you can type wsl in the Windows search bar and run it to get to the WSL2 console.
# Inside WSL2 (Ubuntu)
ip -4 addr show eth0 | grep -oP '(?<=inet\s)\d+(\.\d+){3}'

# Example Output
172.19.113.217
Make sure to remember this IP address. We will use this IP address later when we forward requests from port 443 on the Windows OS, which is the level above WSL2, to WSL2.
1-2. A Method to Fix the WSL2 IP Using an Automatic IP Update Script
Unfortunately, the internal IP used by WSL2 is a dynamic IP, which means there’s a chance it could change every time the computer restarts. As explained earlier, if this changes, the entire network flow will be broken. To prevent this, we will learn how to fix the WSL2 IP.
The principle is simple. We will write a script that runs automatically within Windows. This script works as follows:
- Find the current IP address of the virtual environment.
- Update the
netsh portproxywith the found address each time.
Let’s get to fixing the IP address!
- Create a Scripts folder in your C drive.
- In that folder,
right-clickto create a new txt file. - Change the file name to something like
WSL2 IPand then copy-paste the entire content of the code block below into it.
$ErrorActionPreference = 'Stop'

# 1) IPv4 address of the interface using the Windows default gateway
$winIP = (Get-NetIPConfiguration | Where-Object { $_.IPv4DefaultGateway } | Select-Object -First 1).IPv4Address.IPAddress

# 2) Current WSL2 eth0 IPv4
$wslIP = (& wsl.exe -e sh -lc "ip -4 addr show eth0 | grep -oP '(?<=inet\s)\d+(\.\d+){3}'").Trim()

if ([string]::IsNullOrWhiteSpace($winIP) -or [string]::IsNullOrWhiteSpace($wslIP)) {
  Write-Error "Failed to retrieve IPs. winIP='$winIP', wslIP='$wslIP'"
}

# 3) Clean up existing port proxies
& netsh interface portproxy delete v4tov4 listenport=443 listenaddress=0.0.0.0 | Out-Null
& netsh interface portproxy delete v4tov4 listenport=443 listenaddress=$winIP | Out-Null

# 4) Add new rule (listen on all interfaces)
& netsh interface portproxy add v4tov4 listenport=443 listenaddress=0.0.0.0 connectport=443 connectaddress=$wslIP

# 5) Ensure firewall rule exists
if (-not (Get-NetFirewallRule -DisplayName "eLabFTW HTTPS" -ErrorAction SilentlyContinue)) {
  New-NetFirewallRule -DisplayName "eLabFTW HTTPS" -Direction Inbound -Protocol TCP -LocalPort 443 -Action Allow | Out-Null
}

Write-Host "OK: WIN=$winIP → WSL=$wslIP"- Now, change the extension of the file from something like
WSL2 IP.txttoWSL2 IP.ps1.
1-3. Registering for Automatic Execution with Task Scheduler

- As shown in the picture above, run Task Scheduler as an administrator.

- Select
Create Task... - In the
Generaltab, check Run with highest privileges. - For
Configure for:, you can set it to Windows 10 or a later version. - You can name it something like WSL2 IP eLabFTW.
- Go to the
Triggerstab and selectNew.... - Set
Begin the taskto At log on and click OK. - (Optional) Again in
Triggers,New..., this time add At startup forBegin the task. - In the
Actionstab, selectNew.... - In the
Program/scriptfield, addpowershell.exe. - In the
Add arguments (optional)field, add-NoProfile -ExecutionPolicy Bypass -File "C:\Scripts\WSL2 IP.ps1". - You can check the options in the
ConditionsandSettingstabs and proceed as you wish.
That was the first part! I believe it wasn’t as difficult as you might have thought. Now it’s time for the next part. Since we’ve connected the IP address between Windows and WSL2, we now need to configure the router so that my PC can be reached from the external internet.
2️⃣ Accessing from the Outside (Internet) – Router Port Forwarding + DDNS
2-1. Router Port Forwarding
I assume most labs will go through a router when setting up their office space. The most representative router is, of course, Iptime. This article is written based on iptime. However, I will write it in a way that it can be applied to other routers as well, so don’t worry and follow along.
Checking the Router IP Access
To access our router, we need to know what IP the router provides. Generally, iptime uses 192.168.0.1, but what if it’s not this router? You can follow the method below.
- Run
CMD. - Type
ipconfig -all.
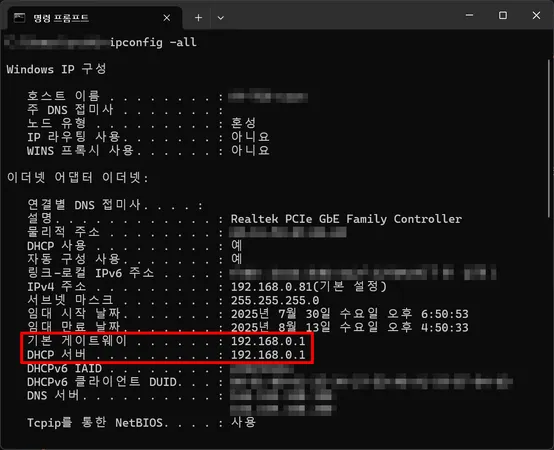
- Enter the IP address written in
Default Gatewayinto yourinternet address bar. - In the accessed
router settings UI, find thePort Forwarding settingssection. - Create a rule like the one below by doing something like
Add Rule.
| Protocol | External Port | Internal Port | Internal IP Address |
|---|---|---|---|
| TCP | 443 ~ 443 | 443 ~ 443 |
Once you’ve done this, when someone tries to connect to our router’s IP address via
https, it will reachelabFTWthrough theWindows PC, and then through WSL2.
Now all that’s left is to get from the internet to the router. This is the final step!!
2-2. DDNS (Dynamic DNS) Setup
Even in the current state, if you enter the externally exposed router IP, you will reach eLabFTW just fine. (The router IP is always exposed to the outside.) But isn’t it difficult to enter the IP every time? We’re going to connect a text-based URL to the router IP, just like we type naver.com.
If you’re using iptime, they provide a free DDNS service.
Let’s access the router settings UI mentioned above.
- Go to
Special Featuresand thenDDNS Settings.- If you’re using another router, unfortunately, it’s highly likely they don’t provide a
DDNSservice. In this case, jump to the section below.
- If you’re using another router, unfortunately, it’s highly likely they don’t provide a
- Enter something you like for
Host Name. Then clickUpdate, and yourRegistered IP Addressand theURL addressyou entered are connected! - You can check if you can connect by entering something like
test.iptime.orgin your internet address bar.
What if you want to use another DDNS service?
- You need to sign up with a free DDNS provider. There’s a really amazing free
DDNSservice provider in Korea. It’s called 내도메인한국, and it’s truly awesome. Let’s visit the link on the left.
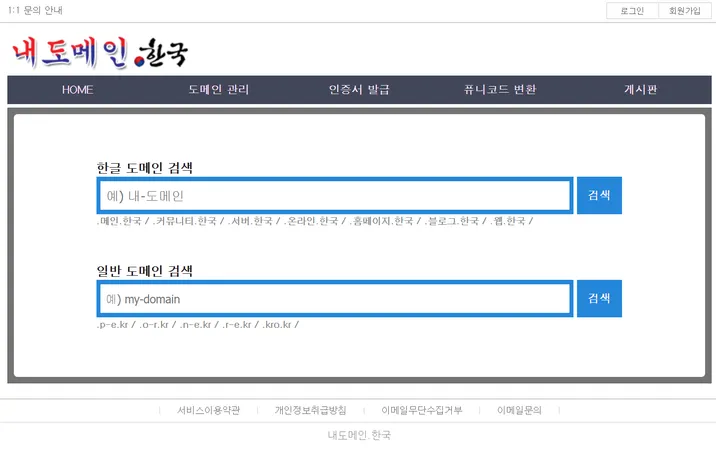
- After a simple
sign-up, enter the URL address you want to use in theGeneral Domain Search. Then, available URLs will appear as shown in the screen below.

- Click
Register.

- As shown in the screen above, select
IP Connection (A)and enter yourPublic IPon the right. You can check yourPublic IPat this link: Check my IP Address. - Enter the
Security Codeand clickModify, and you’re all set!
Now, if you connect to
https://<your-configured-domain(URL)>, you will be successfully connected toeLabFTW.
Now the entire team can connect to eLabFTW through the same network or the internet to share experimental data and utilize the login, signature, and backup features! May new professors far and wide use this system!
Advanced users might want to use a port other than 443. As long as the final destination for
eLabFTWis 443, you can use various ports.
References
- My
knowledgefrom setting up the system myself.
This document was written in a real test environment (Windows 11 WSL2 Docker). Each step may vary slightly depending on the router, firewall, and Docker version you are using. Please always use it in conjunction with the official documentation.